- The Challenge: Provide more in-depth room and space data for Revit elements
- The Solution – Step 1: Understand the three factors to reporting room data within Revit
- Next Steps
The Challenge: Provide more in-depth room and space data for Revit elements
In an architectural model, rooms are a basic building block, influencing how the building is shaped and used. Rooms help orient us within the building, both before and after it is built. Working on the design or maintenance of a building is easier when you know which room a specific part of the building is associated with. Despite its utility, this information is often incomplete or inaccurate in a Revit model. The first step to solving this problem is understanding how the room information is generated.
Recently, I took on the challenge of providing more in-depth room (and space) data for the elements in Revit. This was enlightening process, and I want to share what I learned with the community. The results of my work will be presented here in a series of short blog posts.
In this first post, I elaborate on how room data is reported natively in Revit.
The Solution – Step 1: Understand the three factors to reporting room data within Revit
There are three factors to reporting room data within Revit: rooms, schedules, and elements.
Rooms
Rooms (and spaces) are specific to one phase in Revit. When they are created, their phase is set based on the view they are created in and can’t be changed. This is different than other elements in the model, which span phases. This is an important distinction that is essential to understanding room data.
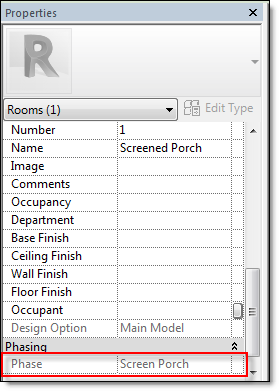
Room data will be easier to gather if all the rooms are associated with the same phase.
Schedules
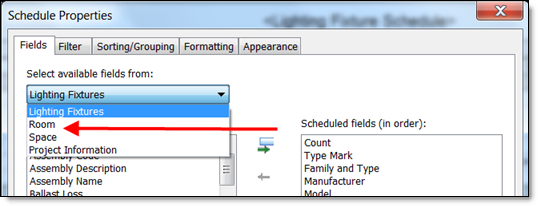
Revit reports room data in schedules for a limited set to categories. When setting the fields used by a schedule, there a drop down labeled ‘Select available fields from:’. If room data is supported for the schedule, the drop down will contain ‘Room’. When selected, the list of fields will change to list parameters that appear on a room. When these fields are added to the schedule, Revit will locate the room the element is in, and then report the parameter value for that room.
This can be very useful for grouping furniture or lighting by where it is located. The trick is that the schedule will only display information for rooms that are the same phase as the schedule. If the room is in a different phase, then the values are blank. This is controlled by the ‘Phase’ parameter in the schedule’s properties. The ‘Phase Filter’ is ignored for rooms
To work around this limitation, all rooms should be placed on the same phase or a schedule must be created for each phase that rooms exist in.
In addition to phase, rooms placed in a design option are only reported in schedules that are set to that same design option. The design option that is displayed by a schedule is controlled by the ‘Visibility/Graphics Overrides’ parameter, which is only displayed if design options are in use.
Elements
The elements that can report room information are limited to a few categories. When creating a family that wants to report room information, first review a matching schedule. Temporarily create a schedule for the desired category and verify that it lists ‘Room’ data in the drop-down.
In addition to the category, the structure of the family determines the exact point that is used to locate the room. Here are the specific rules depending on the family and how it was constructed.
Most Families
The geometric center of the element.

Face Based Families
1’ from the face, taken from the geometric center of the element.
Spaces
At the combination of the location of the space’s reference point (in plan) and the ‘Computation Height’ of the level the space is associated with (in elevation).
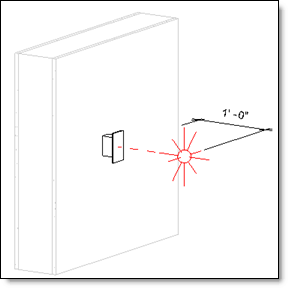
Doors and Windows
1’ from the face of the wall, taken from the geometric center of the element. The ‘To Room’ is determined when the element is placed, set to the swing (for a door) or exterior (for a window) side. The rooms can be “flipped” by editing any of the ‘To Room’ or ‘From Room’ values in a schedule.
Families using a ‘Room Calculation Point’
The point at which the Room Calculation Point is located. The location of this point is the same for all elements of this family, it can’t vary by type or instance.
Doors and Windows using a ‘Room Calculation Point’
The point at which the Room Calculation Point is located. The location of this point is the same for all elements of this family, it can’t vary by type or instance.
The ‘To Room’ is the side the Room Calculation Point points towards. It is “flipped” when the door or window is flipped. Changing the ‘To Room’ or ‘From Room’ values in the schedule will flip the geometry of the door in the model.
Next Steps
With this information, you can begin to troubleshoot room information in Revit. In my next few blog posts, I will highlight the extended information the Ideate Software reports for room data, giving more reliable and complete results.
For more information on the software solutions, training, and consulting Ideate provides, please visit the Ideate, Inc. homepage.

Jesika DiGregorio
Software Team Lead
Jesika received her Bachelor of Architecture from the University of Oregon in Eugene where she also spent time studying advanced math. Her work experience includes Junior Designer at an award-winning firm specializing in architecture and land planning, and Intern Architect at a firm that provides services in planning, design, construction documents and construction administration for projects of all sizes. After working in architecture design for several years, Jesika decided to pursue her interest in programming and her love of efficient systems. She now serves as a Software Team Lead for Ideate Software.